Tutorials/First Year on Hard Difficulty
This tutorial will help you survive the first year on hard difficulty. Please don't feel obliged to follow all the instructions. Experiment, learn from your own failures and find a play style that suits you.
Contents
Map Settings
This tutorial will assume the following map settings:
- Terrain type: Valleys
- Terrain size: Medium
- Climate: Fair
- Disasters: On
- Starting conditions: Hard
Starting Resources
On "Hard" difficulty you start off with:
- Four families (8 adults and 5 children)
- No Wood, Stone or Iron
- 100 Firewood
- 1200 Food
- 20 Tools
- 20 Coats
The 1st year
Forester's Lodge
The first thing to do is to find a good location for a Forester's Lodge, which will be the center of your town, for now. Its working area is shown as a yellow circle. A good place for a Forester's Lodge is in an area without rivers or hills within the yellow circle. Placing it like that will maximize the amount of trees the Foresters can plant and cut down.
Place the building and then assign 1 Builder. You can assign more Builders, but it is a good idea to have a reserve of Laborers for when you will be clearing resources. You can pin the building menu to the screen for easier access to it.
When the building is done you can go ahead and assign 2 Foresters, who will start planting and cutting down trees.
Resources
Now you need resources. Opposite the Forester's Lodge place down a Stock Pile. A size of 4x4 should be enough. You can always build more Stock Piles later, when you need them. The stock pile will be used to store materials cleared from the map (Logs, Stone and Iron) and some produced goods (Firewood).
Now that you have somewhere to store materials you can assign an area for clearance, just outside the yellow ring of the Forester's Lodge. You do not need Iron for now, though it will be useful later. Make the selection fairly large (about 20x20).
If at any point you do not have a clearance job set up, but need more resources, feel free to set one up outside your yellow ringed area.
Gatherer's Hut
Next, you need a Gatherer's Hut. Place it close to the Forester's Lodge, within the yellow ring.
When the building is done you can go ahead and assign 2 Gatherers, who will start gathering Berries, Roots, Mushrooms and Onions.
The Gatherer's Hut is a good source of food early in the game. It produces 4 kinds of food items, which helps to increase (or maintain) the happiness of your population.
Houses
Now that we have a small stock of Food and Wood we can build 2 Houses. To avoid people wasting time walking from their house to their workplace, try to place the houses as close as possible.
Hunting Cabin and Herbalist's Hut
The next few buildings are the Hunting Cabin and the Herbalist's Hut. Each one can be built within the yellow area of the Forester's Lodge.
Another house
Then it is time to build another house. Just be aware of assigning additional clearance tasks if you are running low on a resource. Trees will slowly grow back on their own.
Storage Barn
It is time to increase your storage capacity with a Storage Barn. The cart that you begin with will quickly become full.
End of the year
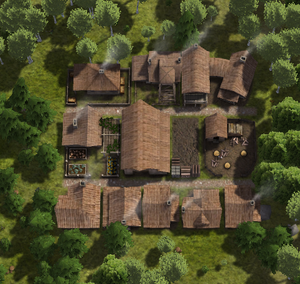
If you got things done swiftly, you should be seeing Winter set in around about the time the last house is being built.
You will probably later on want a central area for all your crafting buildings. It will probably be best to place it close to the center of the map, just outside of the forest we are going to deforest with the forester's lodge. Next to that you will want to construct another house and a wood cutter.
Basic Build Order


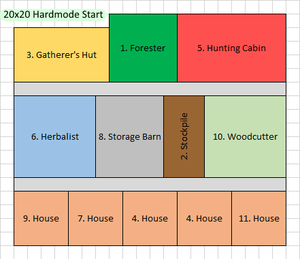
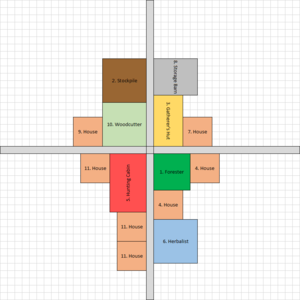
Your building order should be something like this:
- One or 2 people set to builder
- (2 people) working at the Forester's Lodge
- Clearing tasks for resources
- Stock Pile
- (2 people) Gatherer's Hut
- 2x houses
- (1 person) Hunting Cabin
- (1 person) Herbalist's Hut
- 1x house
- Additional clearing tasks for resources
- Storage Barn
- 1x house
- (1 person) Woodcutter
Food for Thought/Next Few Years
After the first year there are a number of paths you can take:
- Trade
- Food
- Market based society
- Mining
Trade Path
Diverse in its options and perhaps in many ways it is the defining moment of mid game. Once you have a Trader assigned to a Trading Post it opens up the rest of your game play. But lets not get ahead of ourselves. Right now we can only just about sustain 4 families, let alone produce enough goods to go into agriculture.
The trade path is quite far off. Perhaps 5 years at minimum, you will want a higher population count and to be almost completely self-sustaining before even building the trade building.
Before you embark on this path, ask yourself, "what can trading give me that I lack?", and, "do I have anything to trade with?". This may be Tools, Clothing or the ability to provide a diverse choice of food for your population. Now with a target you need to find something you can produce efficiently in large amounts. For example, making Alcohol from Berries.
Food Path
After year 1 there are only 2 or 3 buildings that make food. The best option is the Gatherer's Hut.
To produce more food you have to grow your population and then create more building that produce food.
- Go back to your Forester's Lodge and pin it.
- Place another one so the yellow area is only just about overlapping (it doesn't matter so much if they do overlap; about a quarter way to the center is perfectly OK)
- Opposite the building place the Gatherer's Hut and close by 2 wooden houses.
- Then plop down a road to connect the new area to what was built in year 1.
- Keep doing this when you feel you need more food.
Market based society
A market based society is a very effective way to organize where people live and work.
Find an area in the wilderness, close to the center of the map with plenty of areas to build around. Place a Market in the middle.
- Roads - wrap a stone road around the market.
- Extend the road's corners away in a straight line from the building until you reach the Market's yellow ring
- On each corner place a 4x4 Stock Pile.
- Closest to the Market you will want job buildings, like the Wood Cutter. Build them so they face the market.
- Construct roads around the work buildings.
- Construct more houses
This type of organization will help to reduce time wasted traveling to restock houses and walking to work
Mining
Just after the 1st year you are not going to need the resources a Mine or a Quarry can provide, though Stone may soon become a scarce resource. Find an area where you don't plan on building anything, such as an awkward bit of land between 2 rivers, and place down a Quarry. Assign up to 5 people. This will reduce the need to clear cut large areas of your map.
Final Tips
- As you expand you will start to fall behind on some resources. It may sound obvious, but stop what you are currently doing (pause buildings etc) and correct the issue.
- Don't try to do too much at once. For example, you may wish to pause the game and lay out some building plans. If you do so then at least pause the buildings until you have the resources to build it.
- Are you getting to the point where it feels your townspeople are not doing anything? Perhaps you should cancel that map wide clear cut you just ordered.
- Before appointing any tasks that are on the other side of a river, finish building a Bridge to get there.
| ||||||||||||||

